
Step-By-Step Guide To Setting Up Your Blog Is On The Way
But First Read The Info Below...
Congratulations on taking action to get your blog up and running.
Your guide is on the way and will hit your inbox in 10-15 minutes. If
you can't find it be sure to check your spam folder also.
While you wait....
Before we send you blog live we need to get you set up with a
hosting account. The guide below will walk you step by step through how
to do this so that can get up and running the right way, without messing
anything up.
It's fast and simple so lets get it over and done with so the fun can begin!

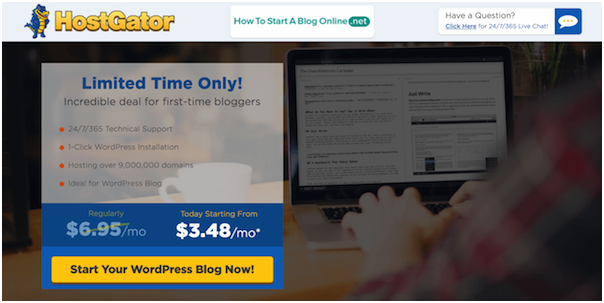
Step 1: Go to HostGator.com
When you get there click on “Start Your WordPress Blog Now!”
Remember: Since I’m using HostGator myself too, I’ve negotiated a discount for readers who use this guide (50% off).
This discount should apply automatically when you click on the link
and you will be taken directly to our special page shown below. Enjoy!
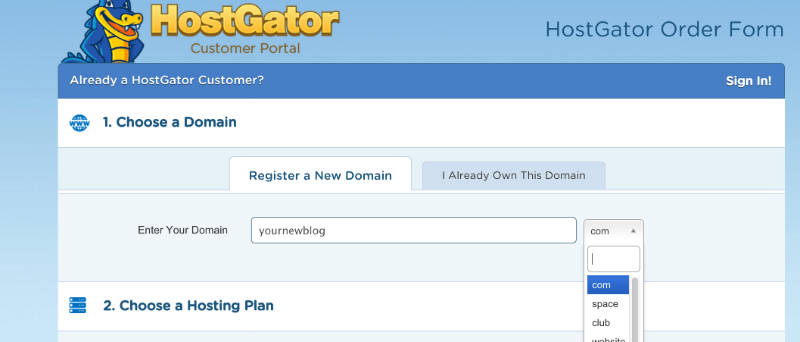
Step 2: Pick a Domain Name For Your Blog
1
(Already have a domain name? Just click on "I already own this
domain" and enter your domain. Then move on to Step 3 by scrolling down a
bit.)
How do I choose a good domain name?
Tip: Don't worry about picking the perfect domain name. Your
domain name isn't cast in stone, you can always change it later if you
wish.
Be sure you choose a domain name that is…
1. Easy to Remember – Don’t choose a nonsensical name, something
tough to spell, or a long name full of dashes.
“www.best-tech-gadgets-in-the-world.com” won’t ever stick in someone’s
head, but something like “www.techgeeks.com” rolls off the tongue.
2. Unique and Descriptive – You want a name that reflects who you are and what you care about. Be creative and build an identity you’re excited about!
3. Trustworthy – Domain extensions like “.com”, “.org” or “.net”
are the most popular, with “.com” being the one most people think of
first. Try to avoid crazy extensions like “.rocks” or “.biz”, as these
are less commonly used, tougher to remember and not as trusted.
Still stuck? Just use your name as the domain name, eg
JohnDoe.com. The pro is that you're free to decide/change your blog
topic later. In the meantime, you get to build your personal branding.
Type the domain name you want to use in the box, then click “next”.
If the name is available, you’ll be able to claim it. If it’s not
available, choose another one.
1
If the name you want isn’t available, HostGator will show you
some alternatives that are similar – or you can punch in a new name and
try again. I’d suggest you to use something that ends with .com, .net or
.org
1
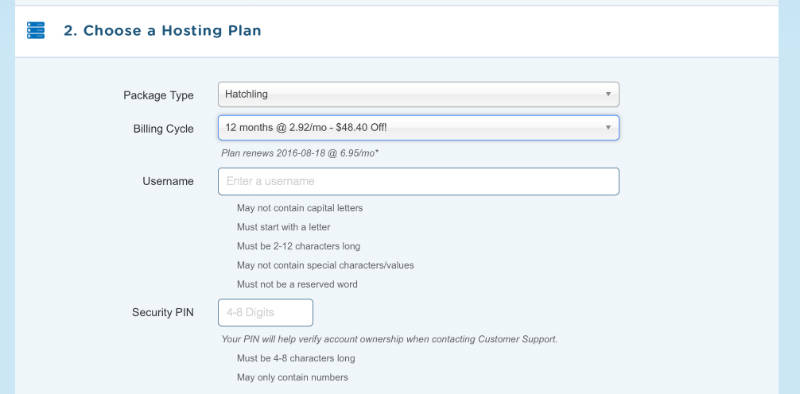
Step 3: Choose your blog hosting plan
I recommend the “Hatchling” plan for now – you can always
upgrade later if you decide you want more advanced features, but you get
more than enough with Hatchling.
Having cold feet? Hostgator offers a 45-day money back guarantee so you have nothing to worry about.
1
4. Complete Your Registration
Once you’ve chosen Hatchling plan and found a name you like that’s
available, you’ll need to register it by putting in your contact and
billing information.
You’ll also have a chance to customize your package a bit. This is a chance to save some more money, so don’t skip it! Apply Coupon code “htsabo” to get 50% off.
1

Tip: To save money, you can un-check the boxes under Add Additional Services. You don't really need them when you're just starting and you can always add them later.
1
Success!
If you cheated and HAVE NOT set up your blog yet what are you waiting for?!?
Time's-a-tickin!
1
About guglietech


No comments
Post a Comment